# Flutter animation 動畫
Flutter animation sample
https://github.com/flutter/samples/tree/master/animations
# Animation
Animation對象本身和UI渲染沒有任何關係。Animation是一個抽象類,它擁有其當前值和狀態(完成或停止)。
Animation對象是一個在一段時間內依次生成一個區間之間值的類。Animation對象的輸出可以是線性的、曲線的、一個步進函數或者任何其他可以設計的映射。 根據Animation對象的控制方式,動畫可以反向運行,甚至可以在中間切換方向。
https://flutterchina.club/tutorials/animation/#animationdouble
Animation<double> animation;// 原本預設是使用Curves.ease
# CurvedAnimation
CurvedAnimation 將動畫過程定義為一個非線性曲線.
final Animation<double> animation = CurvedAnimation(
  parent: animationController ,
  curve: Curves.ease,
);
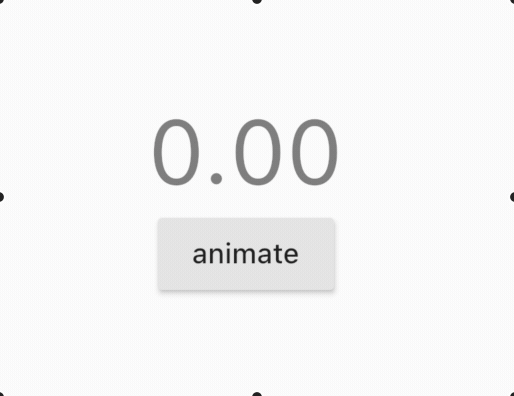
# AnimationController
AnimationController是
Animation的子類AnimationController在屏幕刷新的每一幀,就會生成一個新的值。 默認情況下,AnimationController在給定的時間段內會線性的生成從0.0到1.0的數字。
source: https://github.com/flutter/samples/blob/master/animations/lib/src/basics/03_animation_controller.dart
static const Duration _duration = Duration(seconds: 1);
AnimationController controller;
void initState() {
super.initState();
controller = AnimationController(vsync: this, duration: _duration)
..addListener(() {
// 觸發`build`, 用於更新介面, 另一個適會複雜架構的做法是使用 `AnimatedBuilder` 下面再講
setState(() {});
});
}
Text(
  //`controller.value`: 預設係 0..1
  '${controller.value.toStringAsFixed(2)}', //只顯示小數後兩位
  style: Theme.of(context).textTheme.headline3,
  textScaleFactor: 1 + controller.value, // 根據 0..1 放大字串
)

RaisedButton(
  child: Text('animate'),
  onPressed: () {
    if (controller.status == AnimationStatus.completed) {
      controller.reverse();
    } else {
      controller.forward();
    }
  },
)
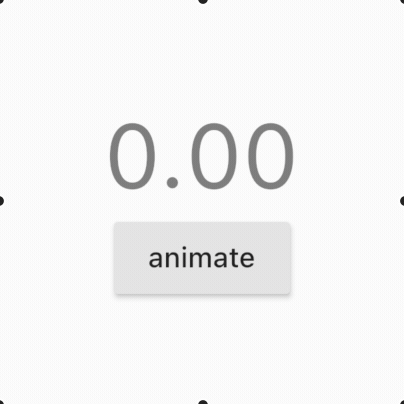
AnimationController 如果什麼都沒有設定的話是使用
Curves.ease, 現在嘗試使用其他:Curves.elasticOut
static const Duration _duration = Duration(seconds: 1);
AnimationController controller;
Animation<double> _animation; //add
CurvedAnimation _curve; //add
void initState() {
super.initState();
controller = AnimationController(vsync: this, duration: _duration)
..addListener(() {
// 觸發`build`, 用於更新介面, 另一個適會複雜架構的做法是使用 `AnimatedBuilder` 下面再講
setState(() {});
});
//add
_curve = CurvedAnimation(parent: controller, curve: Curves.elasticOut);
_animation = Tween(
begin: 0.0,
end: 1.0,
).animate(_curve);
}
Text(
  '${_animation.value.toStringAsFixed(2)}',
  style: Theme.of(context).textTheme.headline3,
  textScaleFactor: 1 + controller.value,
)
以上的例子是0到1, 因為
AnimationController.value的數值預設是0到1如果想要150 到 250 就要用到
Tween
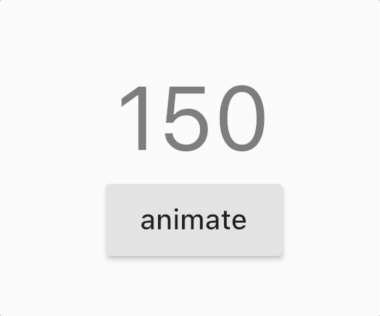
# Tween
加入Animation<double> animation
static const Duration _duration = Duration(seconds: 1);
AnimationController controller;
Animation<double> animation; // add
void initState() {
super.initState();
controller = AnimationController(vsync: this, duration: _duration)
..addListener(() {
// 觸發`build`, 用於更新介面
setState(() {});
});
// controller 定義了 Duration(seconds: 1), 所以在1秒內, 由150到250
animation = Tween(begin: 150.0, end: 250.0).animate(controller); // add
}
Text(
  // controller.value 改成 animation.value, 所以數字是 150至250
  '${animation.value.toStringAsFixed(0)}', // 由於太長,所以今次不要任何小數點
  style: Theme.of(context).textTheme.headline3,
  // 由於字體需要根據 0..1 放大, 所以依舊使用controller.value
  textScaleFactor: 1 + controller.value,
)
效果:
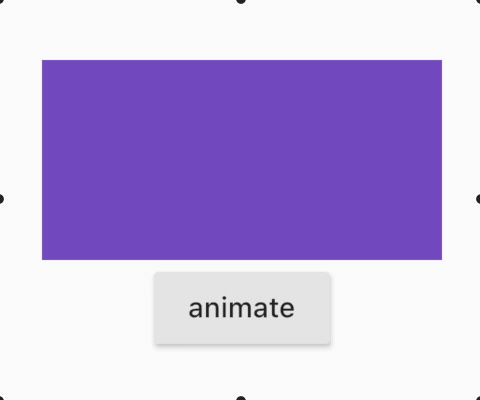
# Color Tween
除了0.0到1.0之外, 還有很多其他
Tween
ColorTween可以實現兩種顏色的變化SizeTween可以實現兩個size的變化IntTween可以實現兩個int值之間的變化CurveTween可以實現動畫非線性變化TweenSequence可以實現多组补间动画source: https://juejin.im/post/5c8e6c11e51d4563131011fc
static const Color beginColor = Colors.deepPurple; // 起點顏色
static const Color endColor = Colors.deepOrange; // 終點顏色
static const Duration duration = Duration(milliseconds: 800);
AnimationController controller;
Animation<Color> animation; // 注意! 今次係 <Color> 類別
void initState() {
super.initState();
controller = AnimationController(vsync: this, duration: _duration)
..addListener(() {
// 觸發`build`, 用於更新介面
setState(() {});
});
// controller 定義了 Duration(seconds: 1), 所以在1秒內, 由`起點顏色`到`終點顏色`
animation =
ColorTween(begin: beginColor, end: endColor).animate(controller);
}
Container(
  width: 200,
  height: 100,
  color: animation.value,
),
效果:
還可以自定
參考:
custom_tween:https://github.com/flutter/samples/blob/master/animations/lib/src/basics/06_custom_tween.dart
# AnimatedBuilder
在上面AnimationController的例子,依靠
addListener來更新界面,但不太適合在複雜的界面使用
static const Duration _duration = Duration(seconds: 1);
AnimationController controller;
void initState() {
super.initState();
controller = AnimationController(vsync: this, duration: _duration);
// 移除 `addListener`, 轉為在UI 使用 `AnimatedBuilder`
// ..addListener(() {
// setState(() {});
// });
}
// AnimationController在屏幕刷新的每一幀,就會生成一個新的值(0.0 到1.0)
// AnimatedBuilder 會在接收到新的值是運行 `builder`
AnimatedBuilder(
  animation: controller,
  builder: (context, child) {
    return Text(
      '${controller.value.toStringAsFixed(2)}',
      style: Theme.of(context).textTheme.headline3,
      textScaleFactor: 1 + controller.value,
    );
  },
)
效果 :
與
AnimationController時一樣
# Animated widget
# AnimatedContainer
簡單説就是一個改變
width和height後會有動畫效果的Container
class ExpandCard extends StatefulWidget {
_ExpandCardState createState() => _ExpandCardState();
}
class _ExpandCardState extends State<ExpandCard>
with SingleTickerProviderStateMixin {
static const Duration duration = Duration(milliseconds: 300);
bool selected = false;
Widget build(context) {
return GestureDetector(
onTap: () {
setState(() {
selected = !selected;
});
},
child: Card(
child: Padding(
padding: const EdgeInsets.all(8.0),
child: AnimatedContainer(
duration: duration,
width: selected ? 256 : 128,
height: selected ? 256 : 128,
curve: Curves.ease,
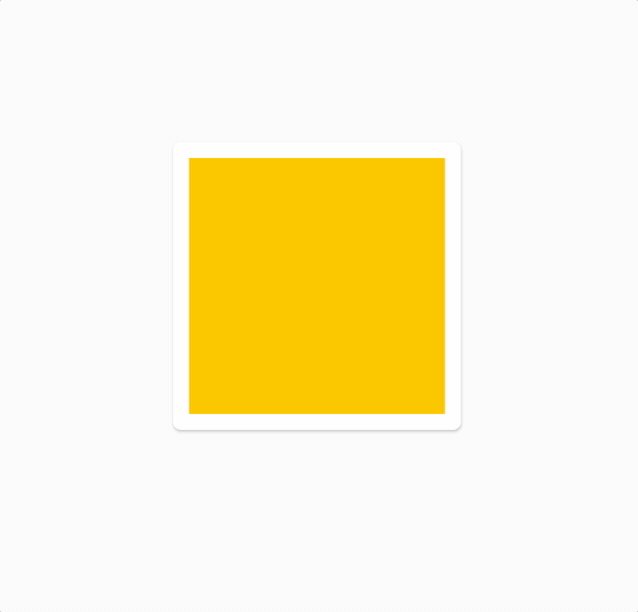
child: Container(
color: selected ? Colors.cyan : Colors.amber,
),
),
),
),
);
}
}
# AnimatedCrossFade
轉換兩個
widget, 帶有淡入淡出的效果

static const Duration duration = Duration(milliseconds: 300);
bool selected = false;
Widget build(context) {
return GestureDetector(
onTap: () {
setState(() {
selected = !selected;
});
},
child: Card(
child: Padding(
padding: const EdgeInsets.all(8.0),
child: Container(
width: 200,
height: 200,
child: AnimatedCrossFade(
duration: duration,
firstCurve: Curves.easeInOutCubic,
secondCurve: Curves.easeInOutCubic,
crossFadeState: selected
? CrossFadeState.showSecond
: CrossFadeState.showFirst,
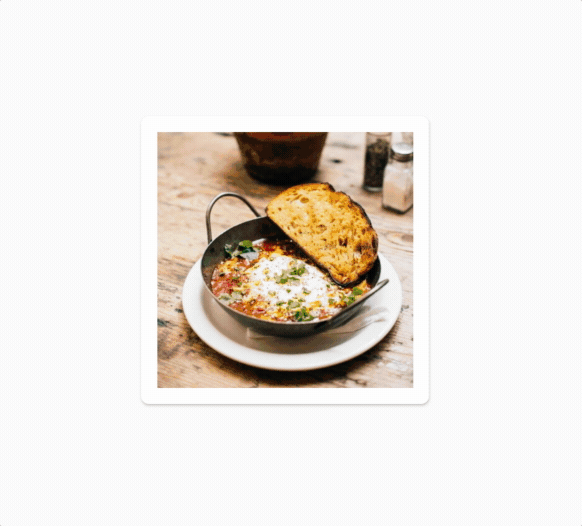
firstChild: Image.asset(
'assets/eat_cape_town_sm.jpg',
fit: BoxFit.cover,
),
secondChild: Image.asset(
'assets/eat_new_orleans_sm.jpg',
fit: BoxFit.cover,
),
),
)),
),
);
}
# AnimatedCrossFade 結合 AnimatedContainer
source: https://github.com/flutter/samples/blob/master/animations/lib/src/misc/expand_card.dart
# AnimatedSwitcher
https://book.flutterchina.club/chapter9/animated_switcher.html
整個widget換的過程加入動畫,同
PageRouteBuilder有點相似
Animation<double> animation;
以下兩種寫法是一樣
var begin = Offset(0.0, 1.0);
var end = Offset.zero;
var curve = Curves.ease; // 原本預設是使用Curves.ease

var tween = Tween(begin: begin, end: end).chain(CurveTween(curve: curve));

animation.drive(tween);
Tween<Offset>(
	begin: const Offset(0, 1.0),
  end: Offset.zero,
).animate(
   CurvedAnimation(
     parent: animation,
     curve: Curves.ease,
   ),
)
定位
